
!!IMPORTANT NOTE!!
———————————-
Before you go testing/implementing the commands that are described in this article, PLEASE ensure you first understand the following major caveat of performing certain actions/commands against files on a live system:
“Reading a file changes its atime eventually requiring a disk write, which has been criticized as it is inconsistent with a read only file system.”
https://en.wikipedia.org/wiki/Stat_%28system_call%29#Criticism_of_atime
You DO NOT WANT TO DO THIS on a target of which you are attempting to perform forensic analysis.
Further reading on the matter
https://superuser.com/questions/464290/why-is-cat-not-changing-the-access-time
When in doubt and/or fear of possibly affecting a target system’s access timestamps, you should ensure the following is true before running the below commands:
- The target file system (or whatever directory you are running this against) has been (re)mounted read-only and/or with the “noatime” and/or “relatime” mount parameters.
If you’re planning to run these commands against a physical disk (image), you can mount the target disk’s filesystem read-only via the following:
$ sudo mount -o ro,... </src/disk> </mount/point>
If you’re planning to run these commands against a live system, you can remount the live root filesystem/directory using the mount command’s --bind option via the following:
$ mkdir /mnt/remount
$ sudo mount --bind / /mnt/remount
Now, while the root filesystem/directory will be re-mounted to a new mount point, it will still be mounted read-write by default. So, before you go accessing anything on it, you need to re-mount it (yes, again) read-only, like so:
$ sudo mount -o remount,ro,bind,noatime /mnt/remount
Note that you don’t necessarily need the noatime attribute given that you’re already mounting the system read-only (and, in theory, should not be modifying any of the file timestamps upon access). However, I’m a “belt and suspenders” kind of guy. So, I’d rather have redundancy, even if unneeded, for the peace of mind.
———————————-
Disclaimer: I did not search the internet for a solution to this article’s challenge as I wanted to come up with one myself. Thus, a solution may already exist that is similar (or not). However, the point of the below article was not to just find a solution and move on. Rather, I wanted to walk readers through a problem statement, step-by-step piecing together a solution, thoroughly documenting and “teaching a man to fish” versus just giving out a fish. That said, I am in no way guaranteeing the below commands to work perfectly in ensuring it finds and properly processes every single file on the filesystem. In fact, when running this live, we are actively avoiding certain areas of the filesystem that are actively changing/ephemeral to minimize the error outputs. The only thing I can guarantee, in true *nix ad-hoc one-liner development, is (dis)function in ways beyond the imagination. ‘Tis a fact we just live with. This post simply describes *options* you can add to your toolkit that can always very much benefit from testing, troubleshooting, and improving.
In addition, while I attempted to identify and explain various aspects of each of my commands, I recognize that there are still improvements that can be done to this command. I attempted to find the balance of thorough explanation and efficiency while not bleeding over into the esoteric.
TL;DR – YYMMV*
*The first Y stands for “Yuuuuuuge”
Enough with the caveats and disclaimers, let’s get down to it…
Linux
Recently, a teammate posed a request to be able to generate a file listing of a directory in Linux showing the size and hash of each file in the output format of “ls -lhS” (list files in long format, with human-readable sizes, in decreasing size output).
As I hit Reply to the email, my initial thoughts were “Why don’t you use FLS?” as that is essentially the de-facto standard for producing a file system listing from an image. However, I got to thinking… FLS doesn’t really provide a comprehensive solution here for a few reasons:
We need a command to run against a LIVE system and FLS only runs against a dead system image*- FLS requires a second step to convert its output to bodyfile format for human-readable timestamps
- FLS doesn’t perform any file hashing
*Actually, this is not true. As one of my colleagues ever-so-graciously reminded me… Although it is not well documented, FLS can run against live systems. You can run it against a live Windows system by using named pipes, a la “fls [options] \\.\<X>:“, where <X> is a logical drive letter like C:, D:, etc. And, a September 2011 SANS blog post here describes it in operation for Windows. To run it against a live Linux or Mac/OS X system, you may do so as such “fls [options] /dev/sd<X><Y>“, where <X> is the physical drive letter like /dev/sda, /dev/sdb, etc. and <Y> is the partition number like /dev/sda1, /dev/sda2, etc.
At any rate, the last two points remain, so it’s good thing I waited to hit send before looking like a dummy.
Instead, I took the challenge in attempting to come up with a command line one-liner to provide what was requested. Initially, I came up with the following:
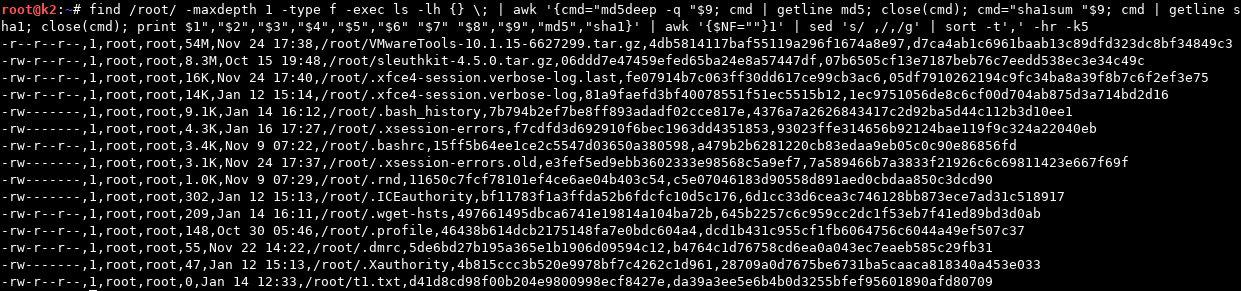
$ find /path/to/dir -maxdepth 1 -type f -print0 | xargs -0 -r ls -lh | awk '{cmd="md5deep -q "$9; cmd | getline md5; close(cmd); cmd="sha1sum "$9; cmd | getline sha1; close(cmd); print $1","$2","$3","$4","$5","$6" "$7" "$8","$9","md5","sha1}' | awk '{$NF=""}1' | sed 's/ ,/,/g’ | sort -t',' -hr -k5
*You may need to Right-Click and Open/View Image in New Tab to see these inserted screenshots in full resolution. Sorry about that.
However, as we can see here, the timestamps produced from a simple “ls -lh” were rather lacking in both what was provided (solely last modification time by default) as well as precision (only precise to the second by default*, and a LOT can happen on a system in a singular second that we’d need to distinguish during an investigation).
== Sidebar 1 ==
You might be wondering why I am piping find’s output to xargs to execute the “ls -lh” against the results versus simply using find’s built-in “-exec” parameter that ostensibly does the same thing. In short, this is for performance reasons which you can read about at the below links.
https://www.everythingcli.org/find-exec-vs-find-xargs/
https://www.endpoint.com/blog/2010/07/28/efficiency-of-find-exec-vs-find-xargs
== /Sidebar 1 ==
== Sidebar 2 ==
Also note that all timestamps will be in the system’s local time. So, it would behoove you to collect that information from the system as well for future reference during analysis. This can be done a few different ways, as shown below:

== /Sidebar 2 ==
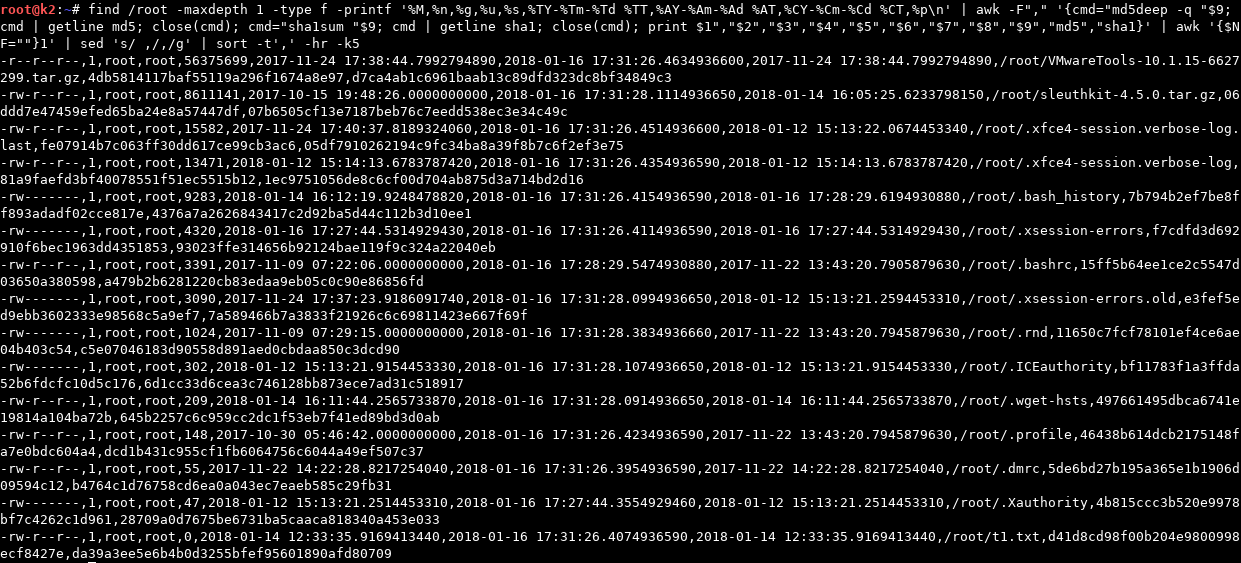
In light of the aforementioned issues (lacking additional timestamps and precision), I worked through a few different solutions and came up with the following which included not only timestamps with much greater precision (now with full nanosecond precision*) but also included all of the GNU “find” command’s printable timestamps (i.e., Last Modified, Last Accessed, and Inode Changed).
$ find /root -maxdepth 1 -type f -printf '%i,%M,%n,%g,%u,%s,%TY-%Tm-%Td %TT,%AY-%Am-%Ad %AT,%CY-%Cm-%Cd %CT,”%p"\n' | awk -F"," '{cmd="md5deep -q "$9; cmd | getline md5; close(cmd); cmd="sha1sum "$9; cmd | getline sha1; close(cmd); print $1","$2","$3","$4","$5","$6","$7","$8","$9","md5","sha1}' | awk '{$NF=""}1' | sed 's/ ,/,/g’ | sort -t',' -hr -k5
**Note that printf’s time field format is precise to 10 digits, while nanoseconds are (by definition) only precise to 9 digits. Thus, it is appending a 0 in the 10-th digit spot. Why? I frankly don’t know. I mean… uhh… “the reason of which will be left as an exercise to the reader.” 🙂
== Sidebar 3 ==
*I later discovered that you can show timestamps with full nanosecond resolution in ls via the “–full-time” parameter as I will show below.
$ ls -l --full-time

total 55088

drwxr-xr-x 2 root root     4096 2017-11-22 14:22:30.165725454 -0800 Desktop
== Sidebar 3 ==
At any rate, we’re making progress, but we’re still missing something. What about Inode (File) Creation? Is that not recorded in Linux? In short, Ext3 filesystems only record Last Modified (mtime, Last Accessed (atime), and Inode Changed (ctime), while Ext4 filesystem (on which a large majority of Linux distress operate) fortunately include the additional Inode Creation time (crtime). Lucky for us, I am doing this on an Ext4 filesystem, so we should be seeing those times if they’re implemented and recorded, right? You’d think so… but you’d be wrong.
Unfortunately, Linux decided not to implement an easy way (aka a natively integrated API) to view/include these (crtime) timestamps in various tools’ output (as seen here in the “find” command, and shortly in the “stat” command). Alas, FRET NOT, as there is a way to extract this timestamp using the debugfs utility. Intended as a “ext2/ext3/ext4 file system debugger”, it provides a “-R” option to execute a given command for debugging purposes. We will (ab)use this option to extract more information (i.e. the crtime timestamp) from the “stat” command than is originally provided by running the command on its own.
First, we will run “stat” against a file:
$ stat /root/VMwareTools-10.1.15-6627299.tar.gz

File: /root/VMwareTools-10.1.15-6627299.tar.gz

Size: 56375699      Blocks: 110112     IO Block: 4096   regular file

Device: fe01h/65025d    Inode: 405357      Links: 1

Access: (0444/-r--r--r--)  Uid: (    0/    root)   Gid: (    0/    root)

Access: 2018-01-12 15:16:03.524147591 -0800

Modify: 2017-11-24 17:38:44.799279489 -0800

Change: 2017-11-24 17:38:44.799279489 -0800

Birth: -
Now, we will use the “debugfs” command to get the Inode/File Birth (crtime) timestamp. Keep in mind, you will need to provide the volume/partition on which the referenced file resides as a parameter to the command, otherwise the command will not work (namely yielding a “No such file or directory while opening filesystem” error). For my example below, my system is using LVM volumes and the file we’re querying resides on my root “k2–vg-root” LVM volume/partition.
$ debugfs -R 'stat /root/VMwareTools-10.1.15-6627299.tar.gz' /dev/mapper/k2--vg-root

Inode: 405357   Type: regular    Mode:  0444   Flags: 0x80000

Generation: 763788199    Version: 0x00000000:00000001

User:     0   Group:     0   Project:     0   Size: 56375699

File ACL: 0    Directory ACL: 0

Links: 1   Blockcount: 110112

Fragment:  Address: 0    Number: 0    Size: 0

ctime: 0x5a18c9a4:be902604 -- Fri Nov 24 17:38:44 2017

atime: 0x5a5941b3:7cf76e1c -- Fri Jan 12 15:16:03 2018

mtime: 0x5a18c9a4:be902604 -- Fri Nov 24 17:38:44 2017

crtime: 0x5a18c9a4:5740e928 -- Fri Nov 24 17:38:44 2017

Size of extra inode fields: 32

Inode checksum: 0x53c3b2b6

EXTENTS:

(0-10239):1859584-1869823, (10240-12287):1873920-1875967, (12288-13763):1902149-1903624
There’s actually a lot of great output here that can be very useful to us as forensic analysts, but we really only need the crtime for our purposes today. So, we can do a little command-line fu to just extract the human readable portion of the crtime timestamp we care about.
$ debugfs -R 'stat /root/VMwareTools-10.1.15-6627299.tar.gz' /dev/mapper/k2--vg-root |& sed -n 's/^crtime.*- \(.*\)$/\1/p'

Fri Nov 24 17:38:44 2017
To go a bit further and match stat’s default timestamp formatting, we can do a bit more command-line fu to yield the following:
$ date +"%Y-%m-%d %H:%M:%S.%N %z" -d "$(debugfs -R 'stat /root/VMwareTools-10.1.15-6627299.tar.gz' /dev/mapper/k2--vg-root |& sed -n 's/^crtime.*- \(.*\)$/\1/p')"

2017-11-24 17:38:44.000000000 -0800
Great, now we have a crtime (Inode/File Creation) timestamp we know and love. But, wait… anyone else noticing something here? The nanoseconds are all zeroes. Hmmm. Well, if we trace our process back a bit, we can see that this is because we are attempting to produce a nanosecond-precision datetime object from a source that obviously doesn’t include it. Obviously, we can’t extract nanosecond precision from an input that doesn’t contain it. So, where do we go from here?
Well, if we look back at the crtime output (crtime: 0x5a18c9a4:5740e928 -- Fri Nov 24 17:38:44 2017) we can see that the second column there contains two sets of hex digits (0x5a18c9a4:5740e928) delineated by a colon. Could it be that this is simply a hex version of the decimal and nanosecond epoch timestamps? Oh, it could, and it is. It turns out the first entry (previous to the colon) is the epoch seconds and the second entry (after the colon) is the nanoseconds. So, we’ll need to go back to our command and alter it to extract, convert, and construct the nanosecond epoch timestamp we’re looking to produce.
The below command extracts both the first and second set of hex digits (epoch seconds and epoch nanoseconds, respectively), converts both of the hex sets to decimal, converts the epoch seconds to a human-readable datetime object using Awk’s strftime formatting, and then divides the nanoseconds portion by four (essentially performing a two-bit shift) as is necessary per Hal Pomeranz’s article on EXT4 Timestamps here.
**Big thanks to Dan (aka @4n6k) for his assist here in leading me to Hal’s article as I was banging my head on this last portion for a bit until discovering this bitwise shift needed to be done. Also, of course, huge thanks to Hal (@hal_pomeranz) as well for this monumental efforts in painstakingly documenting EXT4 Timestamps and these nuances.**
$ debugfs -R 'stat /root/VMwareTools-10.1.15-6627299.tar.gz' /dev/mapper/k2--vg-root |& sed -n 's/^ mtime: \(0x[0-9a-f]+\):\([0-9a-f]+\).*/\1.0x\2/p' | awk -F'.' '{n = strtonum($2) / 4; print strftime("%Y-%m-%d %T",strtonum($1))"."n}'

2017-11-24 17:38:44.799279489
AWESOME. We can now successfully extract the crtime file timestamps programmatically.
Now, let’s put it alllll together and build our one-liner that’s going to help us reach our original goal here of outputting a file listing with all the available timestamps (in MACB order) as well as file hashes (MD5 and SHA1). We will be using the largely native md5sum and sha1sum utilities to produce our hashes so as to avoid the need to install any additional third-party tools.
And, here it is. I give the ugliest (most epic?) command to date to output everything we’ve been looking for:
# find /path/to/dir -maxdepth 1 -type f -printf '%i#%M#%n#%g#%u#%s#%TY-%Tm-%Td %TT#%AY-%Am-%Ad %AT#%CY-%Cm-%Cd %CT#"%p"\n' | awk -F"#" '{cmd="debugfs -R '\''stat <"$1">'\'' /dev/mapper/k2--vg-root 2>/dev/null | grep -Po \"(?<=crtime: 0x)[0-9a-f]+:[0-9a-f]+(?=.*)\" | tr \":\" \" \" | { read e n; echo \"$(date +\"%Y-%m-%d %H:%M:%S\" -d @$(printf %d 0x$e)).$(printf %09d $(( $(printf %d 0x$n) / 4 )) )\";}"; cmd | getline crt; close(cmd); cmd=“md5sum "$10" | cut -d \" \" -f1"; cmd | getline md5; close(cmd); cmd="sha1sum "$10" | cut -d \" \" -f1"; cmd | getline sha1; close(cmd); print $1","$2","$3","$4","$5","$6","$7","$8","$9","crt","$10","md5","sha1}' | sed 's/ *,/,/g’ | sort -t',' -hr -k6
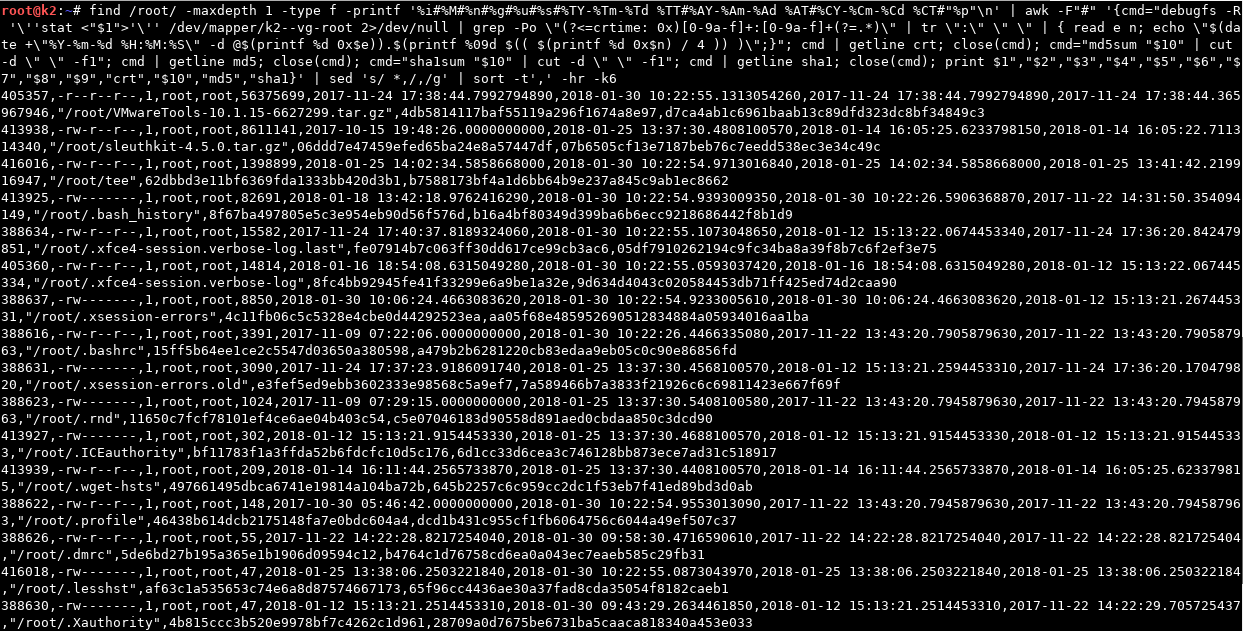
Note that we had to do a few things to deal with various unsavory characters that may occur within filenames (e.g., spaces, parentheses, comma’s, etc.). First, we can’t use comma’s as our print output delimiter as filenames with comma’s would then screw up our Awk parsing. So, we needed to use a non-standard character (i.e. one we would never expect to see in our output). In this case I chose “#”, but you could use whatever you’d like. To get our debugfs stat output, as well as MD5 and SHA1 hashes, we utilize Awk’s ability to execute commands and retrieve the output with its getline function. You may notice that the debugfs stat command one-liner strings together a RegEx with a Lookbehind assertion, along with some bash read/print/date functions in order to translate the hex -> decimal -> formatted human-readable datetime for us.
So… How ‘bout them apples?? WE’VE DONE IT!! All of that painstaking work has paid off in spades. We’ve put together a command that is essentially FLS on steroids (with hashes) that we can run against BOTH a live and dead system! THIS IS WHAT DREAMS ARE MADE OF!
If you’d like to use this* as an FLS replacement against a (dead) system image, simply mount the image’s file system (Read-Only, of course), adjust the command to point to the root of the file system, remove the last “sort” command (as we can do that later during analysis as needed), and simply output to CSV. Like so:
*AGAIN, I PROVIDE NO GUARANTEES HERE, only a best effort here and initial pass on doing this. For example, in one of my test VM’s I kept getting what appeared to be random “sh: 1: printf: 0x: not completely converted” errors that output a default crtime date of “1969-12-31 16:00:00.000000000” which makes no sense as I’ve verified that the crtimes on these files are present and properly output via stat/debugfs and a manual conversion of the values yields success. Yet, it did not happen in other VM’s. So, just a heads up in case something goes awry on your end.
# echo "Inode,Permissions,HardLinks,GroupName,UserName,Size(Bytes),LastModified,LastAccess,Changed,Birth,Filename,MD5,SHA1" > FS_Listing.csv
# find / -xdev ! -path '/var/run/*' ! -path '/run/*' ! -path '/proc/*' -type f -printf '%i#%M#%n#%g#%u#%s#%TY-%Tm-%Td %TT#%AY-%Am-%Ad %AT#%CY-%Cm-%Cd %CT#"%p"\n' | awk -F"#" '{cmd="debugfs -R '\''stat <"$1”>'\'' /dev/mapper/k2--vg-root 2>/dev/null | grep -Po \”(?<=crtime: 0x)[0-9a-f]+:[0-9a-f]+(?=.*)\" | tr \":\" \" \" | { read e n; echo \"$(date +\"%Y-%m-%d %H:%M:%S\" -d @$(printf %d 0x$e)).$(printf %09d $(( $(printf %d 0x$n) / 4 )) )\";}"; cmd | getline crt; close(cmd); cmd="md5sum "$10" | cut -d \" \" -f1"; cmd | getline md5; close(cmd); cmd="sha1sum "$10" | cut -d \" \" -f1"; cmd | getline sha1; close(cmd); print $1","$2","$3","$4","$5","$6","$7","$8","$9","crt","$10","md5","sha1}' | sed 's/ *,/,/g' >> FS_Listing.csv
Note that we are:
- First writing a “header” line to the CSV file for easier reference during analysis
- Now operating from a ROOT prompt (e.g. the leading “#” denoting a root prompt versus the “$” denoting a standard user prompt) as we will need root privileges to access/read the entire filesystem
- Avoiding traversal of external mounted filesystems (i.e. network shares, external media, etc.) via the “-xdev” parameter, and
- Specifically avoiding a few directories via the “
! -path /path/to/avoid/*” as the aforementioned paths store ephemeral process information we aren’t interested in collecting (at least not for our purposes here).
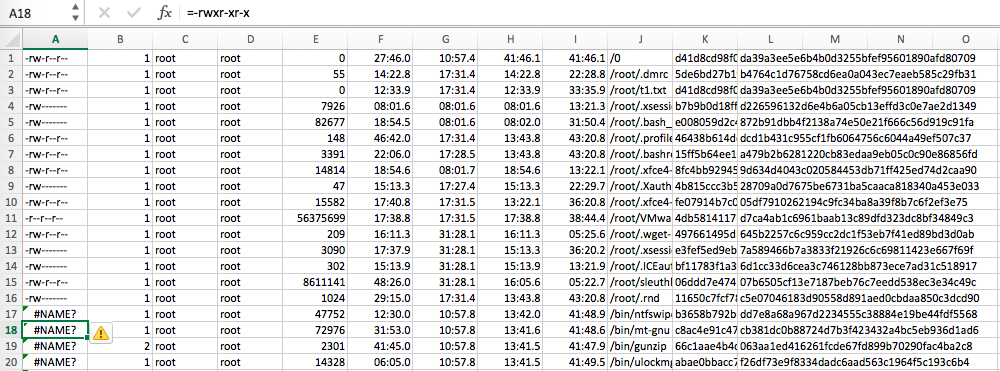
Excel ProTips: If you are using Excel to review the CSV file, be aware that Excel only displays time precision down to the milliseconds (and no further). Alas, you will be missing everything beyond the 3 digits past the decimal place. In order to display this millisecond precision, you will want to highlight all the MACB timestamp cells, right-click, select Format Cells, select Custom under the Number tab, input the Type as mm/dd/yyyy hh:mm:ss.000 (or whatever you like, the important part is the timestamp’s trailing .000), then click OK. And, Voila!, millisecond timestamp precision. Obviously, it is most valuable to be able to actually see the full nanosecond precision but at least it’s something for those who are die-hard Excel fans.
Also, for whatever reason, Excel does something weird with displaying some of the leading permissions entries by prepending a “=“ to them. Why, I have no idea. Maybe Excel gets confused and sometimes tries to interpret “-“ text as an intended negative or minus sign and thus attempts to “fix” it for us (in true Microsoft fashion) by denoting it as a formula and prepending the “=”? ¯\_(ツ)_/¯ For whatever reason, it’s happening (see below). Just be aware that this is something Excel is adding and that it is NOT present in the original CSV if you’re using any other tools for analysis.
Now… how about doing this on a Mac? OF COURSE we’re going to translate this over…
Mac
If you’ve been reading my blog (and/or working between Linux and Mac systems for a while), you’ll know that things do not often translate directly to from Linux (GNU) to Mac (BSD) as the core utilities seem to always differ just enough to make your life a pain when working between systems. And, this situation is no different.
As you might assume, we are going to use the “stat” command again as the basis for extracting all of our timestamps. However, we will of course be using the BSD stat command and not the GNU version as used in Linux. Below is the default BSD “stat” output (the format of which is of course different from GNU “stat” because… why not):
$ stat .vimrc

16777220 1451064 -rw-r--r-- 1 jp staff 0 54 "Sep 22 12:08:02 2017" "Dec 26 10:36:32 2016" "Dec 26 10:36:32 2016" "Dec 26 10:12:15 2016" 4096 8 0 .vimrc
The upside here is that, by default, BSD “stat” outputs all 4 HFS+ filesystem timestamps we care about! Great, but which are what? Saving you some time and research, BSD “stat” outputs timestamps in the following order by default:
Last Accessed, Last Modified, Inode Changed, Inode Birth - (A,M,C,B)
Just as we discussed earlier, these reflect the time file was last accessed, the time the file was last modified, the time the inode was last changed, and birth time of the Inode. So, in order to get them into an order we like (okay, the order that I like) such as MACB (because this is how we most often see the timestamp acronym), we can perform the following:
$ stat -t "%b %-d %Y %T %Z" .vimrc | awk -F'"' '{print "Modified: "$4; print "Accessed: "$2; print "Changed: "$6; print "Birth: "$8}'

Modified: Dec 12 2016 10:36:32 PST

Accessed: Sep 9 2017 12:08:02 PDT

Changed: Dec 12 2016 10:36:32 PST

Birth: Dec 12 2016 10:12:15 PST
And, there we have it, full timestamp information in the order we (I) like it. Do note that HFS+ timestamp precision is only down to the second as it does not implement nanosecond resolution like some other filesystems. And, for that, we do a hearty ¯\_(ツ)_/¯. Fortunate for us in the future, APFS has implemented nanosecond timestamp resolution. But, that’s a separate discussion you can read about here.
Now that we’ve taken care of that timestamp acquisition and formatting issue, let’s move on to building the command line statement we’re going to run. While GNU’s find utility provides a “-printf” option to format and customize find’s output, BSD’s find lacks such an option. Alas, we will need to be a bit more creative here. What I ended up doing here was piping find’s output to BSD’s “stat” command which DOES provide a formatting option “-f” that we can utilize. But, again, it’s not as straight forward as just copy/paste of the previous formatting we used on Linux because OF COURSE the print delimiters don’t directly translate over either.
So, first we need to translate over the previous GNU print formatting string ('%i#%M#%n#%g#%u#%s#%TY-%Tm-%Td %TT#%AY-%Am-%Ad %AT#%CY-%Cm-%Cd %CT#”%p”\n') into the correlated BSD values, which end up being the following:
'%i^%Sp^%l^%Sg^%Su^%z^%Sm^%Sa^%Sc^%SB^"%N"'
I’m using “^” as a delimiter this time instead of “#” as I ended up actually having files with hash/pound signs in their name on my system (THANKS, ATOM APP). Also, note that I’m using single-tick’s for the print statement and using full quote encapsulation for the filename. I’m doing this in order to avoid issues with dollar signs ($) in filenames. Again, no, using such delimiters is not very pretty, but it’s required. And, if you for some reason have files with “^” in their names, it will break this as well. So, YMMV.
$ find /Users/jp -maxdepth 1 -type f -print0 | xargs -0 stat -t "%Y-%m-%d %H:%M:%S" -f '%i^%Sp^%l^%Sg^%Su^%z^%Sm^%Sa^%Sc^%SB^"%N"' | sort -t'^' -nr -k6

Note that I also needed to specify stat’s “-t” argument to format the datetime output in the printf statement.
So, there we have it, listing directory output in decreasing file size.
Now, on to calculating and appending our MD5 and SHA1 hashes to the output. For this, we will use BSD’s native md5 and shasum utilities. Using much of the same structure from our Linux one-liner, we then come up with the following:
# find /Users/jp -maxdepth 1 -type f -print0 | xargs -0 stat -t "%Y-%m-%d %H:%M:%S" -f '%i^%Sp^%l^%Sg^%Su^%z^%Sm^%Sa^%Sc^%SB^"%N"' | awk -F"^" '{cmd="md5 "$11" | cut -d \" \" -f4"; cmd | getline md5; close(cmd); cmd="shasum "$11" | cut -d \" \" -f1"; cmd | getline sha1; close(cmd); print $1","$2","$3","$4","$5","$6","$7","$8","$9","$10","$11","md5","sha1}' | sort -t',' -nr -k6

And there we have it, a directory listing with hashes sorted in decreasing file size. Note that were are now again in a root shell to avoid file access permissions.
Now, on to the final one-liner to do a full filesystem listing:
# echo "Inode,Permissions,HardLinks,GroupName,UserName,Size(Bytes),LastModified,LastAccess,Changed,Birth,Filename,MD5,SHA1" > OSX_Listing.csv
# find -x / -type f -print0 | xargs -0 stat -t "%Y-%m-%d %H:%M:%S" -f '%i^%Sp^%l^%Sg^%Su^%z^%Sm^%Sa^%Sc^%SB^"%N"' | awk -F"^" '{cmd="md5 "$11" | cut -d \" \" -f4"; cmd | getline md5; close(cmd); cmd="shasum "$11" | cut -d \" \" -f1"; cmd | getline sha1; close(cmd); print $1","$2","$3","$4","$5","$6","$7","$8","$9","$10","$11","md5","sha1}' >> OSX_Listing.csv
Note that OS X find’s “-x” parameter is equivalent to GNU’s “-xdev”, meaning not to enumerate external disks/mounted filesystems.
When I ran this against my full system, I realized it choked on files containing “$”. So, I needed to add in some Awk substitution to escape the dollar sign with a leading “\” so that the shell wouldn’t attempt to interpret the “$” as (mis)indication of a variable when it was simply a dollar sign in a file name. Full disclosure: it may also choke on other files with special characters, but I’ve shown you how you can use Awk substitution as a way around it. So, update/augment this as needed.
Conclusion
Sooooo, Wow. That was a bit of hard work. Actually, it was A LOT of hard work, much of which was not captured in the blog post for the sake of brevity and everyone’s sanity, as it surely tested mine many a time. However, hopefully you can see the value of spending the time building effective and efficient processes on the front end so you are not always paying for it on the back end. Suffice to say, IMHO, sometimes it is ok to work harder and not smarter, when the process will help you become more of the latter.
If you wanted to run any of the above commands against a mounted evidence image, you’d simply specify its mount point in the find command, like so:
# find /mnt/point/ ...
Note that we don’t use the “-xdev” or “-x” parameter here as we do actually want it to enumerate an external filesystem (i.e. our mounted evidence image’s filesystem which is likely from an external disk or network share).
And, now that we’ve walked through doing all of that the hard way using native Linux utilities, I will say that another filesystem enumeration capability to include hashes has also been built in Python in Jim Clausing’s macrobber.py script. However, due to Python’s os.stat call limitations, this script does not/cannot pull the btime (aka crtime) attributes that we are able to identify and extract through our commands here. Nonetheless, it is another option, which is always great.
Thanks to everyone for hanging in there through this whole post. It obviously takes way more time to painstakingly walk through every step of a process; however, I feel it is well worth my time to teach people to fish, and hopefully you all do too.
Leave a Reply